Tapping a Hydrant


Photo by PROVIDED

Photo by PROVIDED
One of the most basic firefighter skills is tapping a hydrant and is likely to be encountered in firefighter 1 class or department equivalent. The focus of teaching this skill may be slightly different depending on the instructor. For example, if the firefighter is learning from a company officer, then the approach will be from that departments standard operating procedure (SOPs) as the policies of other departments are for the most part irrelevant.
If a firefighter is learning how to tap a hydrant from a firefighter 1 class, then the approach may be more “vanilla” for lack of a better term. State fire classes have their curriculum (same as any department SOPs) and usually cannot deviate from that too much if at all. Realistically, there is really is no way to take into account the nuances of hundreds of different departments anyway.
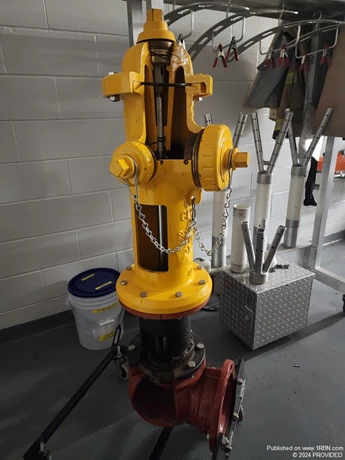
From a municipal instructor i.e. state fire standpoint it is best to focus on the commonalities between state curriculum and local SOPs full well knowing that most if not all divergence is procedural which should really not be taught and emphasized until the end of the lesson anyway. That said having designed hydrant tapping drills for Explorers I found it best to start with baseline terms and how a hydrant actually works i.e. what actually happens when the stem nut is turned at the top. This requires two things – a vocabulary list and an open hydrant model that includes being able to view the below ground parts.
Here are some common hydrant parts/tools/terms:
Steamer Cap – largest of the three caps on the front of the hydrant
Hose Cap – the auxiliary caps on the sides of the hydrant
Stem Nut – Hex screw at the top
Upper Barrel – body of the hydrant that is above ground
Lower Barrel – Body of the hydrant that is below grade
Valve – Located at the bottom of the hydrant that allows water flow when opened
Dry Barrel–The hydrant is drained after use and the shut off is located below grade. These hydrants are used in cold areas to avoid damage and in-operation due to freezing.
Wet Barrel – The barrel has water all the time. The shut off valves are located above ground. Easier to use with water present at all times. Used in warmer climates.
Hydrant bag – Contains all had tools necessary for opening a hydrant and should include but not limited to hydrant wrench(es), rubber mallet, gated wye, adapters, spanner wrenches.
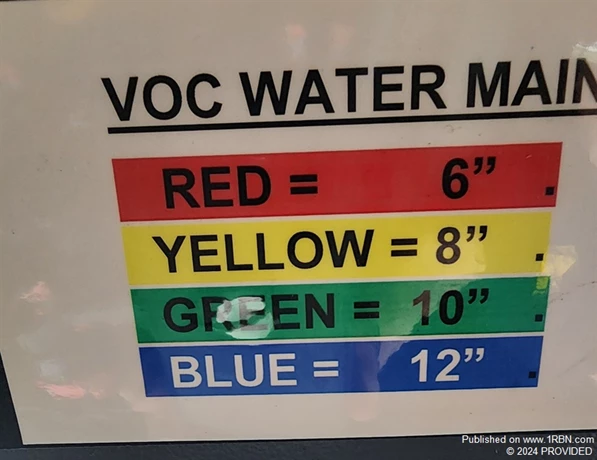
Once the terms are down and all the firefighters are familiar with the parts proceed to discuss the colors of the hydrants, caps and other accessories such as flags or metal posts associated with hydrants. Most firefighters know that the different colors of caps and flags reference the size of the water main the hydrant is based on but remember your audience; hydrant tapping is a firefighter 1 skill so color schemes on hydrants will be important information to build on as the firefighter becomes more experienced and advances into firefighting operations.
Colors (NFPA 291) can also indicate municipal versus a privately owned hydrant and that can definitely have an impact on firefighting operations.
Moving on to procedure for opening a hydrant a good instructor will focus on the commonalities but reference and prepare a beginning firefighter for the fact that local department SOPs are likely to be different. Some of the more common procedures would include but is not limited to:
- Open the hydrant standing behind it so that there are no injuries due to any loose caps being forced off by water pressure.
- Clear any other firefighters for the same reason as presented in #1.
- Open the hydrant all the way to flush it out first.
- Close the hydrant all the way to put on LDH.
- Open the auxiliary cap and attach a gated wye.
- Signal the pump operator that the hydrant is ready to go.
As far as any subtleties some departments have you wrap the hydrant with LDH while others use a gate to initially flush the hydrant. Still others will only tap the auxiliary port closest to the fire where some will hook up a gated wye to one side and a 2 1/2 inch hose to the second. Be prepared as an instructor to addresswhythesedifferencesexist–besidesjustsaying“well,that’stheSOP”. Alwaysrememberasan instructor that you want the firefighters in your class to go back to their respective departments with new ideas. Those new ideas may end up improving a department.
Whatever the procedure it is important to practice the entire procedure until it is mastered because you never know when the situation will dictate changes. Drawing on my own experience, at one fire we couldn’t get the steamer cap off as the nut was stripped and so we had to tap both auxiliary ports in order to get enough water and through two separate lines.
A good instructor should include additional firefighting operations information such as how weather may affect opening a hydrant even going so far as to plant a seed that as firefighters and community residents to look around their own neighborhoods and shovel out hydrants if you live in an area with snow or possibly even report or remind their department to make certain hydrant inspections are done accordingly if you notice one in need of maintenance. Lastly, would be for firefighters to familiarize themselves with all the hydrants in district relative to location, type and how best to tap that hydrant.


